


When you have limited time and you love to craft, that’s when digital stamps and papers come in handy! This week I felt so inspired by our brand ambassadors. They are wonderful designers and they have created stunning projects all month long. (If you’re curious about their work please visit our Facebook page to see what they have been sharing lately!)
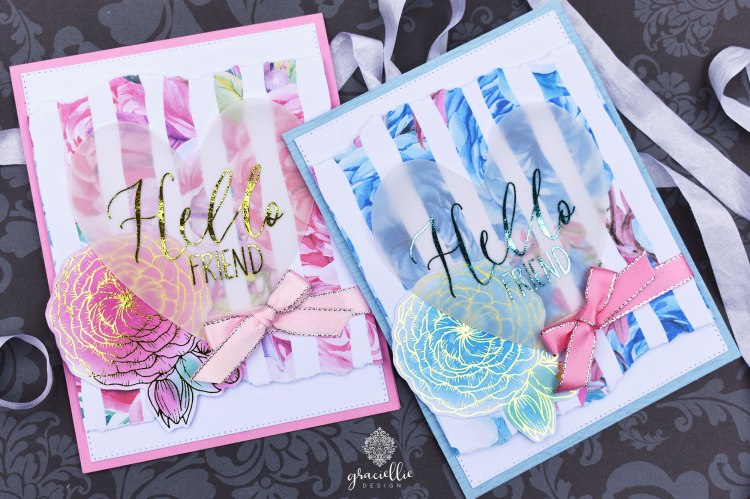

I wanted to make something pretty with our new digis, but didn’t have much time to play… So I came up with this card design which is super cute and extra quick to make. To create this card:
1. Print the distressed floral stripes pattern from our new Pink & Blue Watercolored Digital Papers. I sized them in 5″x 7″ prior to printing using the printer’s software. That will allow you to print to panels in one cardstock sheet.
2. Next, rip a wide piece of the printed sheet so you can fit it across a 4″ x 5 1/4″ white card panel. Adhere it and cut the excess along the edges with scissors.

3. Print the flowers and the Hello Friend sentiment from the set Friends like You, using a laser printer. In this case I printed the flowers on white cardstock and the sentiments on vellum.
Note: You can take your images to an office / paper store and print as many sheets as you need.
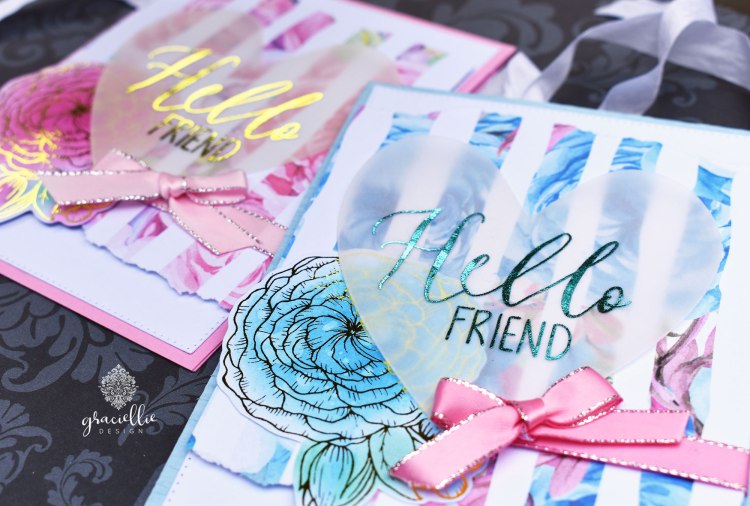
4. Use your favorite Deco Foil sheets to foil the flowers and sentiments. All you do is cover the image with a piece of Deco Foil Transfer Sheet and run it through a laminator.
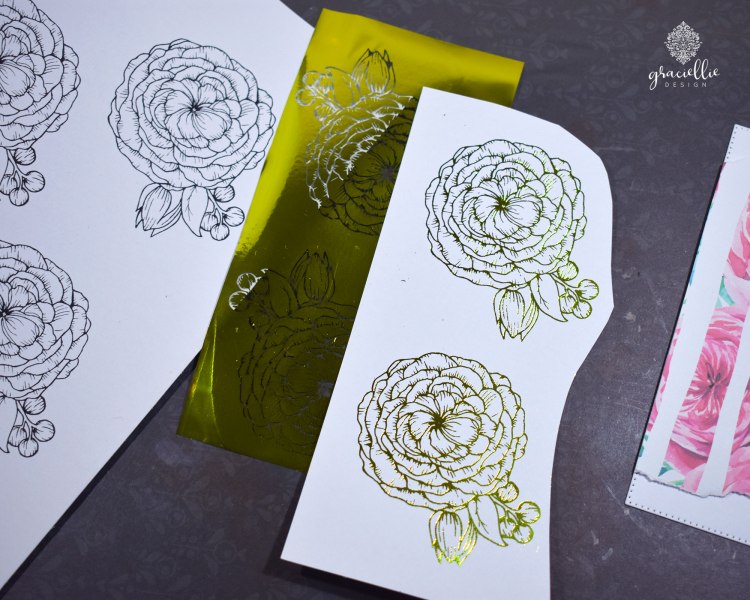
5. Use pigment inks and a sponge dauber to add color to the flower digi and fussy cut it using scissors. Click here to see a tutorial on this foil resist technique.
6. Use a heart die cut to cut the foiled sentiment.
7. Put your pieces together and finish off your design with ribbon and/or other embellishments of your choice.

Supplies: Friends Like You Digital Stamp Set / Pink & Blue Watercolored Digital Paper Pack / Laser Printer (for digital stamps) / Inkjet Printer (for patterned paper) / Gina K. Designs Fancy Foils™ 6″ x 8″ • Jelly Bean Green / Deco Foil™ Transfer Sheets • Aqua / Colorbox Pigment Inks PaintBox in Love / Distress Oxide ink in Salty Ocean / Sponge ink applicators / Vellum / White Cardstock / Laminator / Sticky Dot Mini Runner / Deco Foil™ White Foam Adhesive / Heart die cut / Evolution Advanced die cutting machine / RRR Satin Ribbon with Silver Metallic Edges Assortment – Pink and Purple / Paper Temptress Sky Blue Crepe Cardstock / Paper Temptress Pink Basis #80
These cards took no time! I love how easily you can add color to a foiled image with simply sponging some ink! That truly saves you time. The papers and foiled details do a lot for this design, but I especially love adding transparencies -such as vellum- to my cards!
More Tutorials
I hope you enjoyed! Thanks so much for stopping by. I invite you to visit my previous posts to check out my latest tutorials. I have 2 new video tutorials out sharing techniques using stencils, foil and rubber stamps. Click here to watch. That’s all for now, until next time!
SHARING WITH: SSS WEDNESDAY CHALLENGE – ADD A SENTIMENT / WORD ART WEDNESDAY – AG /

They are so beautiful! Love the heart vellum sentiment too.
LikeLike
Beautiful and easy to do. Thanks for the idea!
LikeLike
Such gorgeous cards!! Love the torn edge and the heart shaped vellum! Your beautiful papers make it a snap to create lovely cards quickly!
LikeLike
Beautiful and elegants cards.
LikeLike
Beautiful!!
LikeLike
AWESOME card, I love the digital printed paper and the foiling!
LikeLike
Fantastic design and execution on a lovely card. So glad to have found you through the SSS challenge.
LikeLike
Oh, I love your background idea! A great use for those large-scale papers I have been hoarding! Thank you for sharing this with us at the Simon Says Stamp Wednesday challenge!
LikeLike
GORGEOUS cards, Gracie. Thanks so much for sharing your talents with us.
Karen
Word Art Wednesday
LikeLiked by 1 person
gorgeous card and stamp gracie
LikeLike