Hello there! It’s Gracie posting today and I’m glad to have the chance to share with you another card I designed using the beautiful and versatile products carried by Classy Cards ‘n Such store. I created a shabby chic card with lots and lots of layers and elements.
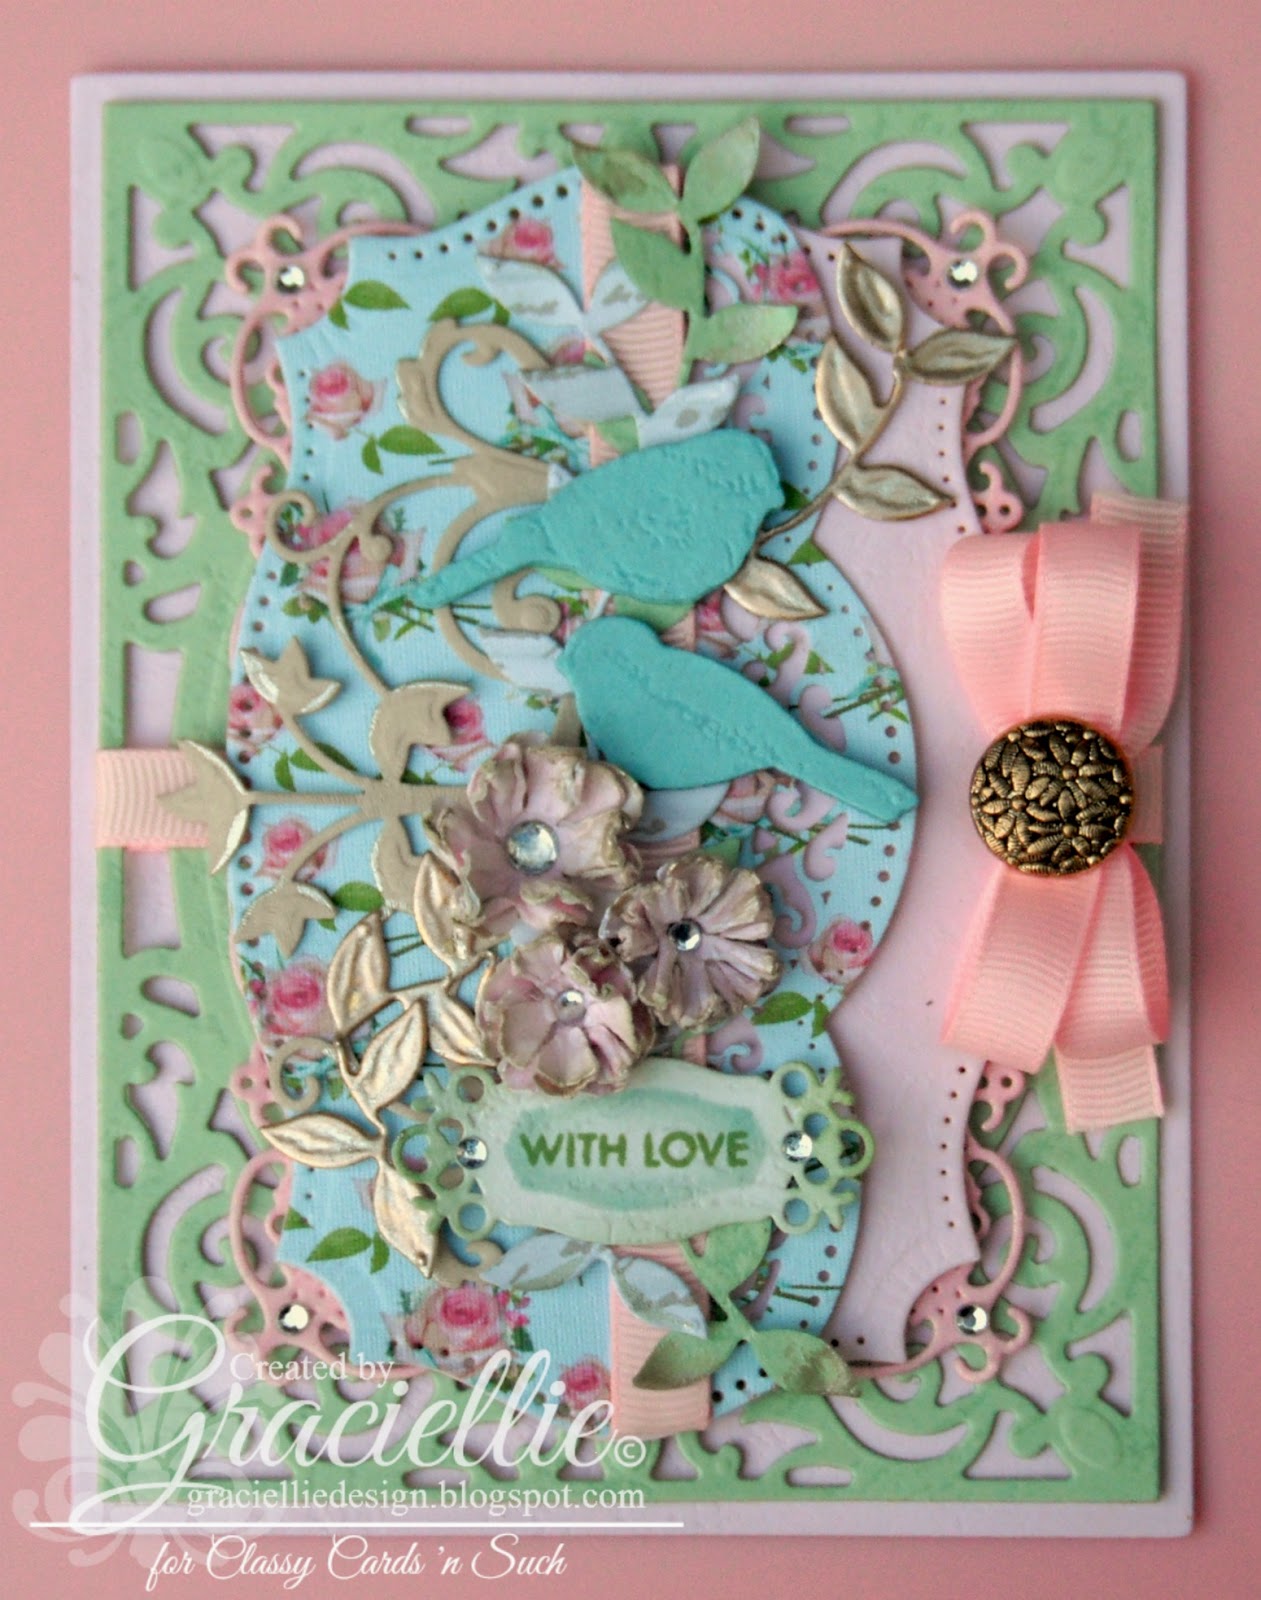
I started off die cutting two labels with Spellbinders Decorative Labels Twenty Five. You can also get the same result using the classic Labels Twenty-Five, available at the store. I die cut one label from pink cardstock and another one from a digital floral patterned paper I designed, and that I printed on White Pearl Linen. The patterned label was also cut with a Spellbinders A2 Scalloped Borders One, but I suggest you check out A2 Curved Borders One, which would work nicely too. I mounted the patterned piece on top of the pink label, aligning them perfectly.

I added a piece of pink ribbon approximately across the middle of the layered label, vertically, hiding the ends behind the patterned piece. I adhered a Fantastic Flourish Three, and some vines die cut from green cardstock, one of my digital old handwriting patterned papers (also printed on White Pearl Linen), and Precious Metals Craft Foil by Spellbinders in gold that I painted with silver acrylic paint. I also attached some birds from Impression Obsession’s Birds Set, which I die cut twice and mounted to create a decoupage effect. I continued embellishing my label with some small flowers cut with Spellbinders Rose Creations and Carnation Creations, and that I adorned with some Baby Rhinestones – Silver. I also attached a little Fancy Label Tag One on which I stamped “with love” from Avery Elle’s Simply Tags stamp set. I framed the label with a medium die cut from Spellbinders Timeless Rectangles, cut from Stardream Rose Quartz, and then added some Baby Rhinestones – Silver to it’s corners.

Once the central label was fully embellished, I prepared my card base. The card base was cut from soft pink cardstock with A2 Matting Basics A. Then I layered it with a frame from A2 Filigree Delight. I added a piece of pink ribbon across the middle of the frame, horizontally, and then mounted the embellished label right on top of it. Finally I added a double bow decorated with a vintage button.
I love the final look of this shabby chic card. I hope you enjoyed seeing my card and reading how I made it! Remember that most of the supplies used are available now at Classy Cards ‘n Such store. I invite you to visit and check out all the new items added recently. If you purchase some goodies make sure to type my code Gracie-10 during checkout to get 10% off your entire order!
Thanks so much for stopping by!
I’d like to submit my card to:
Anything Goes – Inspiration Destination
Anything Goes – Divas by Design
For the One you Love – Ruby’s Rainbow
Challenge #22 – Creative Colors


Just gorgeous Gracie! WOW! So many luscious layers of die cuts and beautiful papers! Love your birds and wonderful shabby flowers! Your vintage button is the perfect embellishment! So chic! hugs 🙂
LikeLike
Wow, this is so gorgeous!! I love all of the beautiful layers!! The dies you used are fabulous!! The birds are so sweet!! I love this!! Have a great weekend 🙂
Lisa
A Mermaid's Crafts
LikeLike
Thanks so much! Made my day dear friend!
LikeLike
Lisa I love to read your comments! Thanks so much for all the kind words!
LikeLike
Beautiful, Beautiful and more beautiful!! your card art is amazing!!
LikeLike
Hi,
Beautiful card. Make sure to post our color palette aswell, Thanks.
Thanks for joining us at CCC and good luck.
hugs
Claudia
DT Creative Colors Challenge
LikeLike
Great details! Thanks for sharing your fabulous card and joining us for our current challenge at Inspiration Destination. Hope to see you again and good luck!
Ema
IDCB Owner
LikeLike
That is a beautiful creation. I love all the details. Thank you for sharing it with us at Divas by Design this week. Hugs, Justyna xx
LikeLike
Your card is absolutely beautiful! Amazing shabby chic design!
LikeLike
Gracielle this is gorgeous. Love all the details & layers! Thanks for joining us at Creative Colors Challenge#22. Good Luck!
LikeLike
Please post our color palette to be eligible for the prize. Thank you.
LikeLike
Thank you so much for sharing with us at Ruby's Rainbow for our 'For the one you love' challenge.
Happy crafting
Helen P (DT) x
LikeLike
Wow, this is amazing! I love the colours! The different layers, the doubble bow and pretty embellishments.
Thank you for sharing your talent with us at Ruby´s Rainbow. Hope to see you back soon!
Nick
LikeLike