
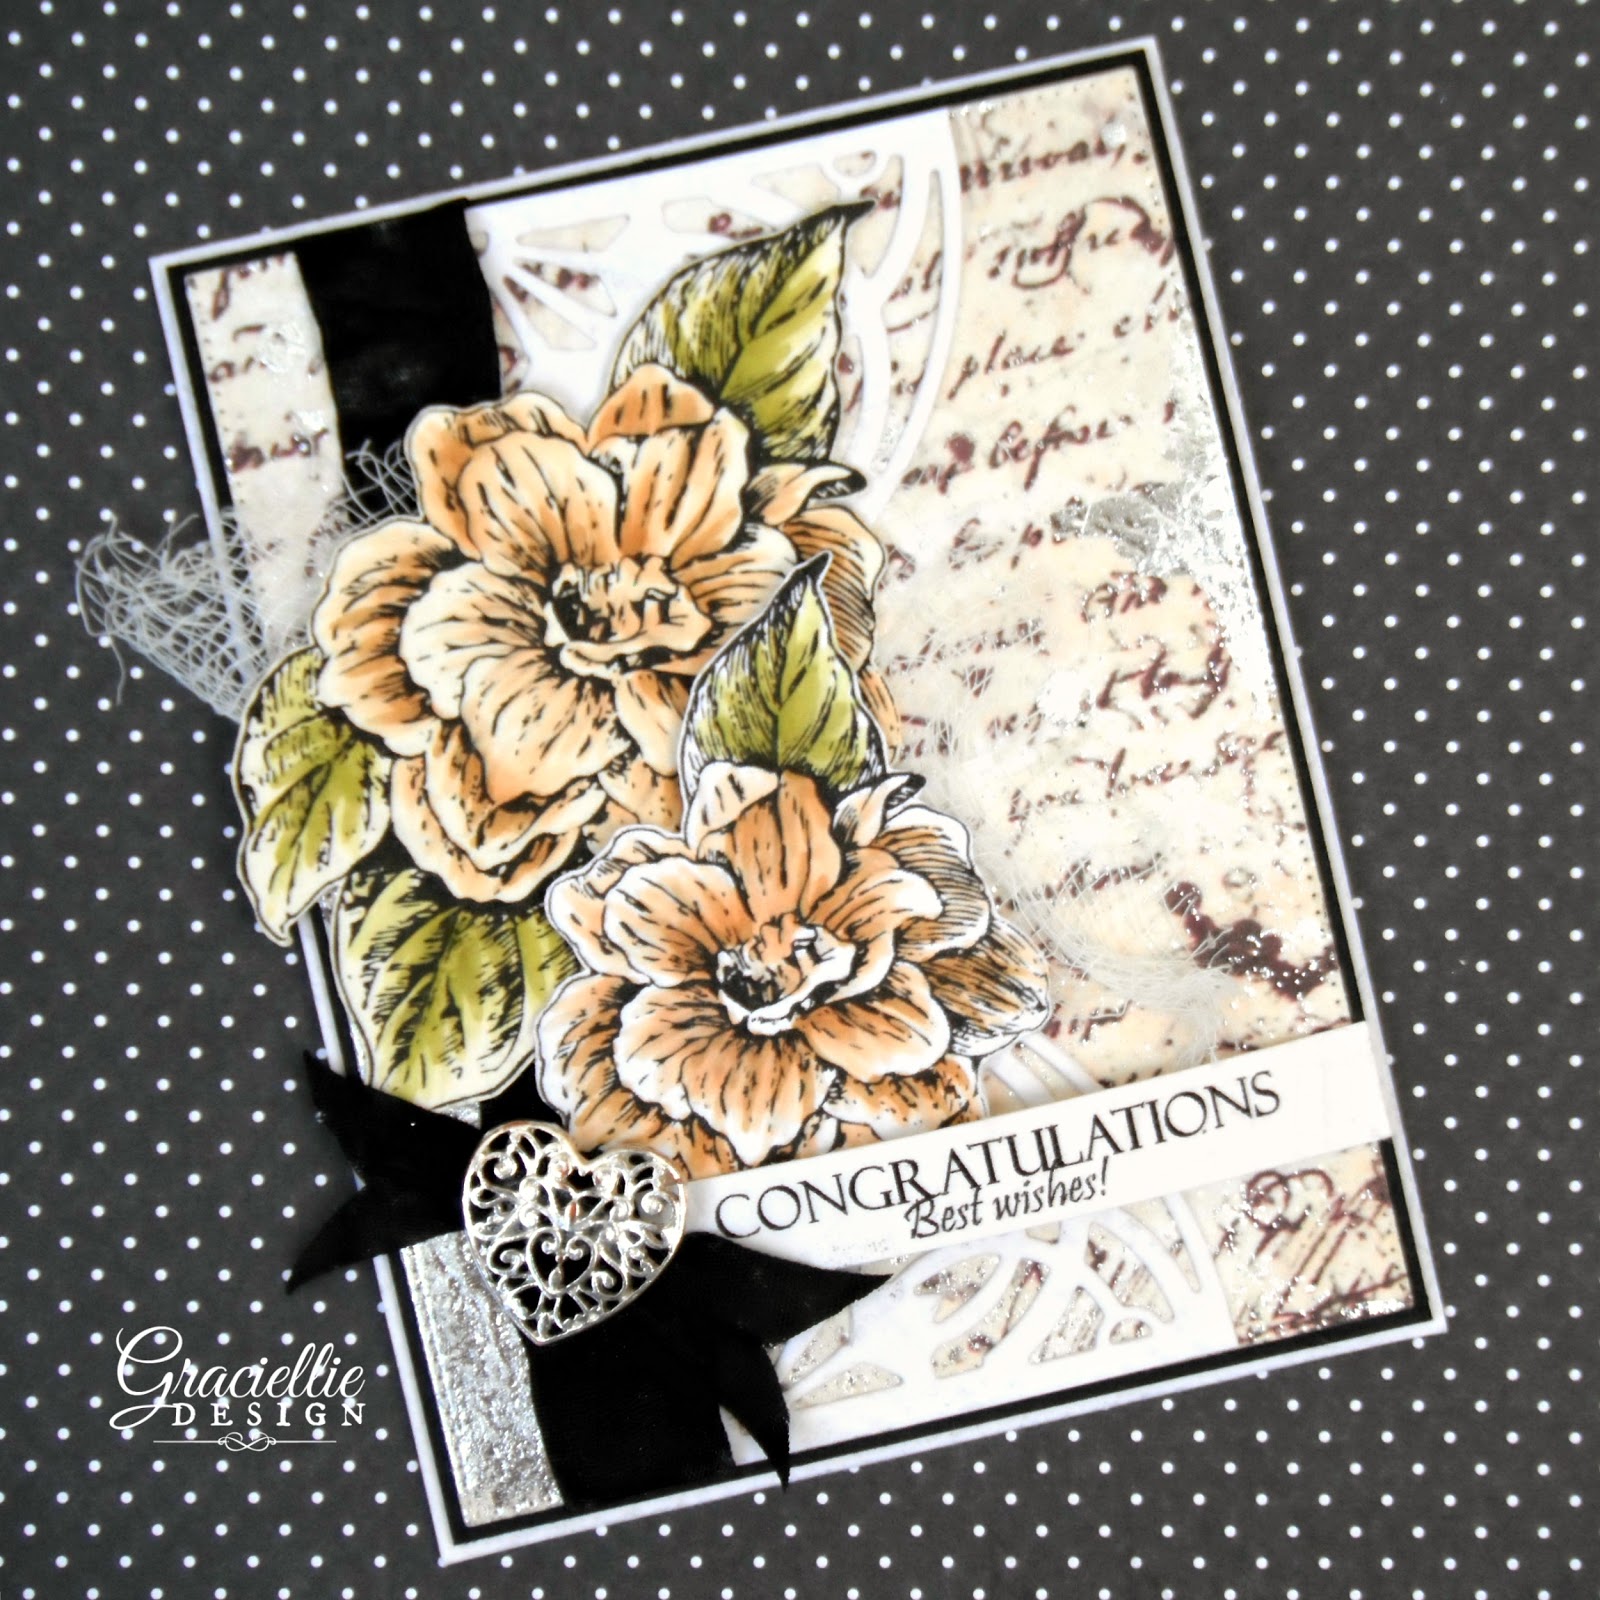
This month I’ll be featuring new Thermoweb Decofoil techniques and tutorials on how to create unique foiled effects on paper. Today I’m sharing the first tutorial. You’ll learn in a few quick steps how to create unique distressed backgrounds using foil. The result is almost as if you would have painted, splattered and splashed your paper with paint only with a much more beautiful texture, foil.

Supplies:
Thermoweb | Decofoil Transfer Sheets in Gold and Silver, Decofoil Adhesive Pen
Minc Mini machine (or a Foil Laminator)*
3M Spray Adhesive (also suggest Decofoil Fusible Spray Adhesive)
Digital Stamps | Graciellie Design Thoughtful Greetings set
Dies | Spellbinders: Arched Elegance Pocket, A2 Matting Basics
Coloring | Spectrum Noir Markers: CG1, CG2, FS3, TN2, GB8
Miscelaneous | Papers: Vintage handwriting patterned paper, White and Black cardstock / Tools: Printer, scissors, paper trimmer / Embellishments: Crinkle ribbon, silver heart button, gauze
*Not strictly necessary.

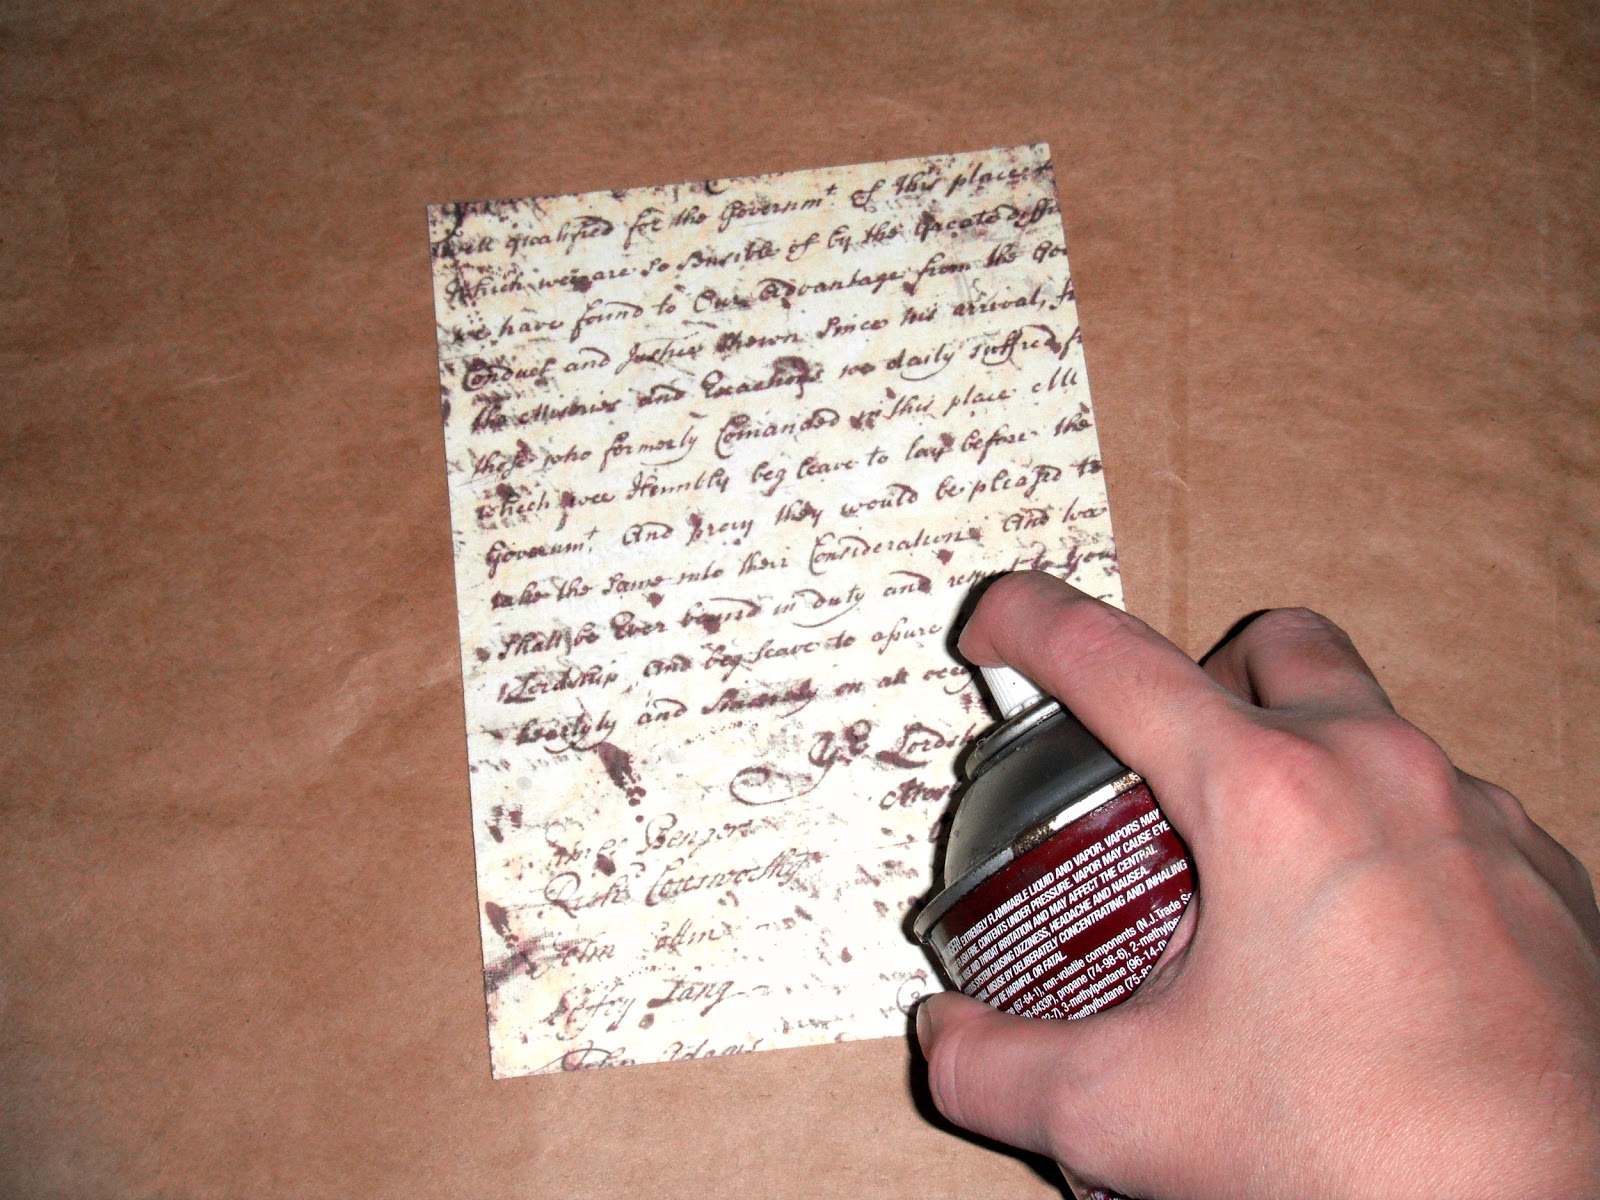


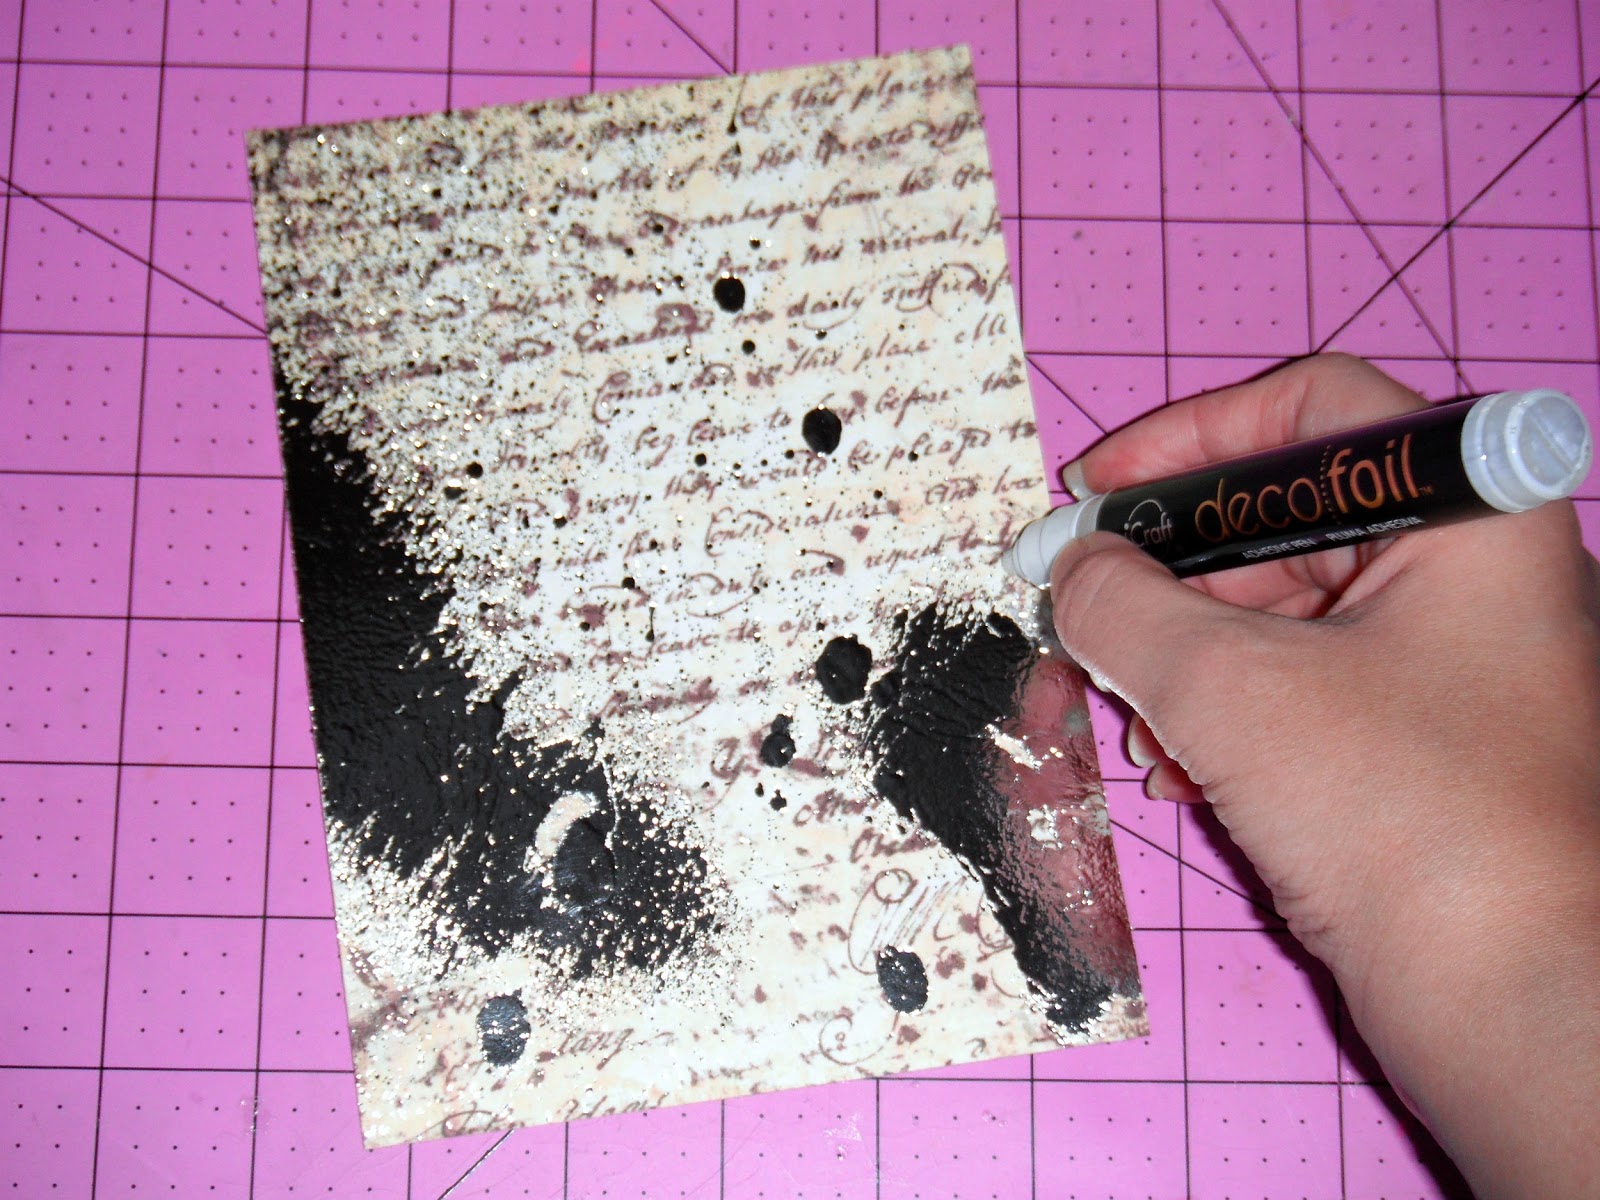


This technique is super easy to achieve and it creates unique backgrounds every time. You can get a lot of backgrounds from 1 single foil transfer sheet and you really don’t need that much adhesive, so this DIY is very affordable too! Make sure you visit Thermoweb’s shop to check out their Decofoil line of adhesives and transfer sheets.
I hope you enjoyed today’s post. If you found this tutorial useful please let me know in the comments. I will be back soon with a second technique using Decofoil, so stay tuned!

Thanks for stopping by. Remember to subscribe to my newsletter so you don’t miss any new tutorial, product feature or giveaway!
Sharing with:
The Card Concept – Anniversary Inspiration / The Paper Girls – Mixed Media / The Mod Squad Challenge – What’s in your background / SSS Challenge – Happy Birthday / Dies R Us Challenge – Add Scallops / Double D Challenges – Yellow / Scrapyland Challenge – AG / Crafting for all Seasons – Use die cuts / House of Cards – Add Script / Word Art Wednesday – AG


Oh my gosh! What a cool technique! And this flower is my favorite digi yet! GORGEOUS!!!
LikeLike
This is positively gorgeous. So breathtaking. Thanks for joining us over at The Card Concept.
LikeLike
Oh wow, what a fabulous technique, Gracie!! Absolutely stunning card!! It looks amazing!! Have a great day!! Big hugs 🙂
Lisa
A Mermaid's Crafts
LikeLike
How extremely stunning! Thank you for the awesome tutoria!
LikeLike
How extremely stunning! Thank you for the awesome tutoria!
LikeLike
Wow, your card is stunning! Fantastic technique! Great tutorial~
Sherrie K
LikeLike
So gorgeous in every way. Great colors and love the dimension and design.
LikeLike
I came through The Card Concept blog. Thanks for the sweet comments on my card. Your card is absolutely gorgeous. And thanks for the detailed tut on foiling.
LikeLike
Beautiful card with all the pretty details and a great tutorial and technique! Thank you for joining us at Double D for our 'YELLOW' challenge!
Diane DD DT
LikeLike
Pretty card! Thanks for sharing the details! I pinned the link!
LikeLike
This is stunning and I can't wait to try this!
LikeLike
This is stunning and I can't wait to try this!
LikeLike
Stunning background. Love the foiled look and so pleased you shared with us at The Card Concept
LikeLike
Gorgeous creation Gracie! Thanks for sharing your tips/tricks! Thanks so much for joining in the fun at our Double D ‘YELLOW’ Challenge! We hope you’ll come back often.
Darlene
DOUBLE D Challenge Blog
DAR’S CRAFTY CREATIONS
LikeLike
Your DecoFoil/Minc card has made me excited to try out my new Minc machine and start creating. After getting the technique mastered, I'll be sharing this with my girlfriends in our 'card pros' group. Thanks for the mini lesson.
LikeLike
Your card is absolutely gorgeous! Love all your tips! Thanks for sharing with us at Scrapy Land Challenges!
LikeLike
Absolutely gorgeous card and the detail in the background really makes a difference on this card. Thanks so much for playing along with us at The Mod Squad Challenge. Good luck, and hope to see you again.
Barbara, Mod Squad Challenge Host.
LikeLike
Hi Gracie! I'm back again with my Dies R Us hat on and wanted to thank you so much for sharing your beautiful designs with us for our 'SCALLOP' challenge. Please come back again soon!
Darlene (DRU Blog Leader)
DIES R US CHALLENGE BLOG
DAR’S CRAFTY CREATIONS
LikeLike
LOVELY card and unique idea for the Minc:)) Thanks for celebrating with us at The Card Concept!
LikeLike
Gracie, I LOVE this beautiful technique! Your card is gorgeous! Thanks for joining us at House of Cards!
Take care!
Michele
LikeLike
Everything you do is gorgeous! How do you make the hydrangeas and other flowers that are at the very top of your page? Would love to be able to create something like that. Thanks, Suzanne
LikeLike
Gorgeous card and a great technique, thank you for sharing it with us at HOC.
LikeLike
WOW this is gorgeous! I bet in person it is even more stunning!! thank you for playing along with us at simon says stamp wednesday challenge!
LikeLike
Hi Suzanne! Thanks for stopping by. Feel free to browse my video tutorials to learn how I make these flowers. Hope you come back soon!
LikeLike
Love this card! Your stamps are gorgeous!
Good to see you at The Card Concept!
Lilian
The Leaf Studio
LikeLike
That is just a fabulous card! Absolutely stunning. Thank you for joining us at Crafting For All Seasons challenge. Mary DT x
LikeLike
Such an impressive card, I love the wonderful background you had created, it is stunning, and the colors are subtle at the same time, I am in awe at your card, thanks for stopping by my blog 🙂 I am so glad you did, otherwise I would have missed this beautiful creation!
LikeLike
Lovely creation! I like the yellow you used on the blooms! Thank you so much for joining us at House of Cards! Mynn xx
LikeLike
Gorgeous !
Thanks for joining us at Scrapy Land Challenges and good luck !
Maryvonne , DT Member
LikeLike
Hi, Gracie.
A real gem you made!!! Stunning as allways!
Thanks for joining us at House of cards.
Hugs, Rosi HOC-DT
LikeLike
Hi, Gracie.A real gem you made!!! Stunning as allways!Thanks for joining us at House of cards.Hugs, Rosi HOC-DT
LikeLike
This is so pretty! I've never worked with foil…looks like fun! Thanks for joining us this month at House of Cards!
LikeLike