
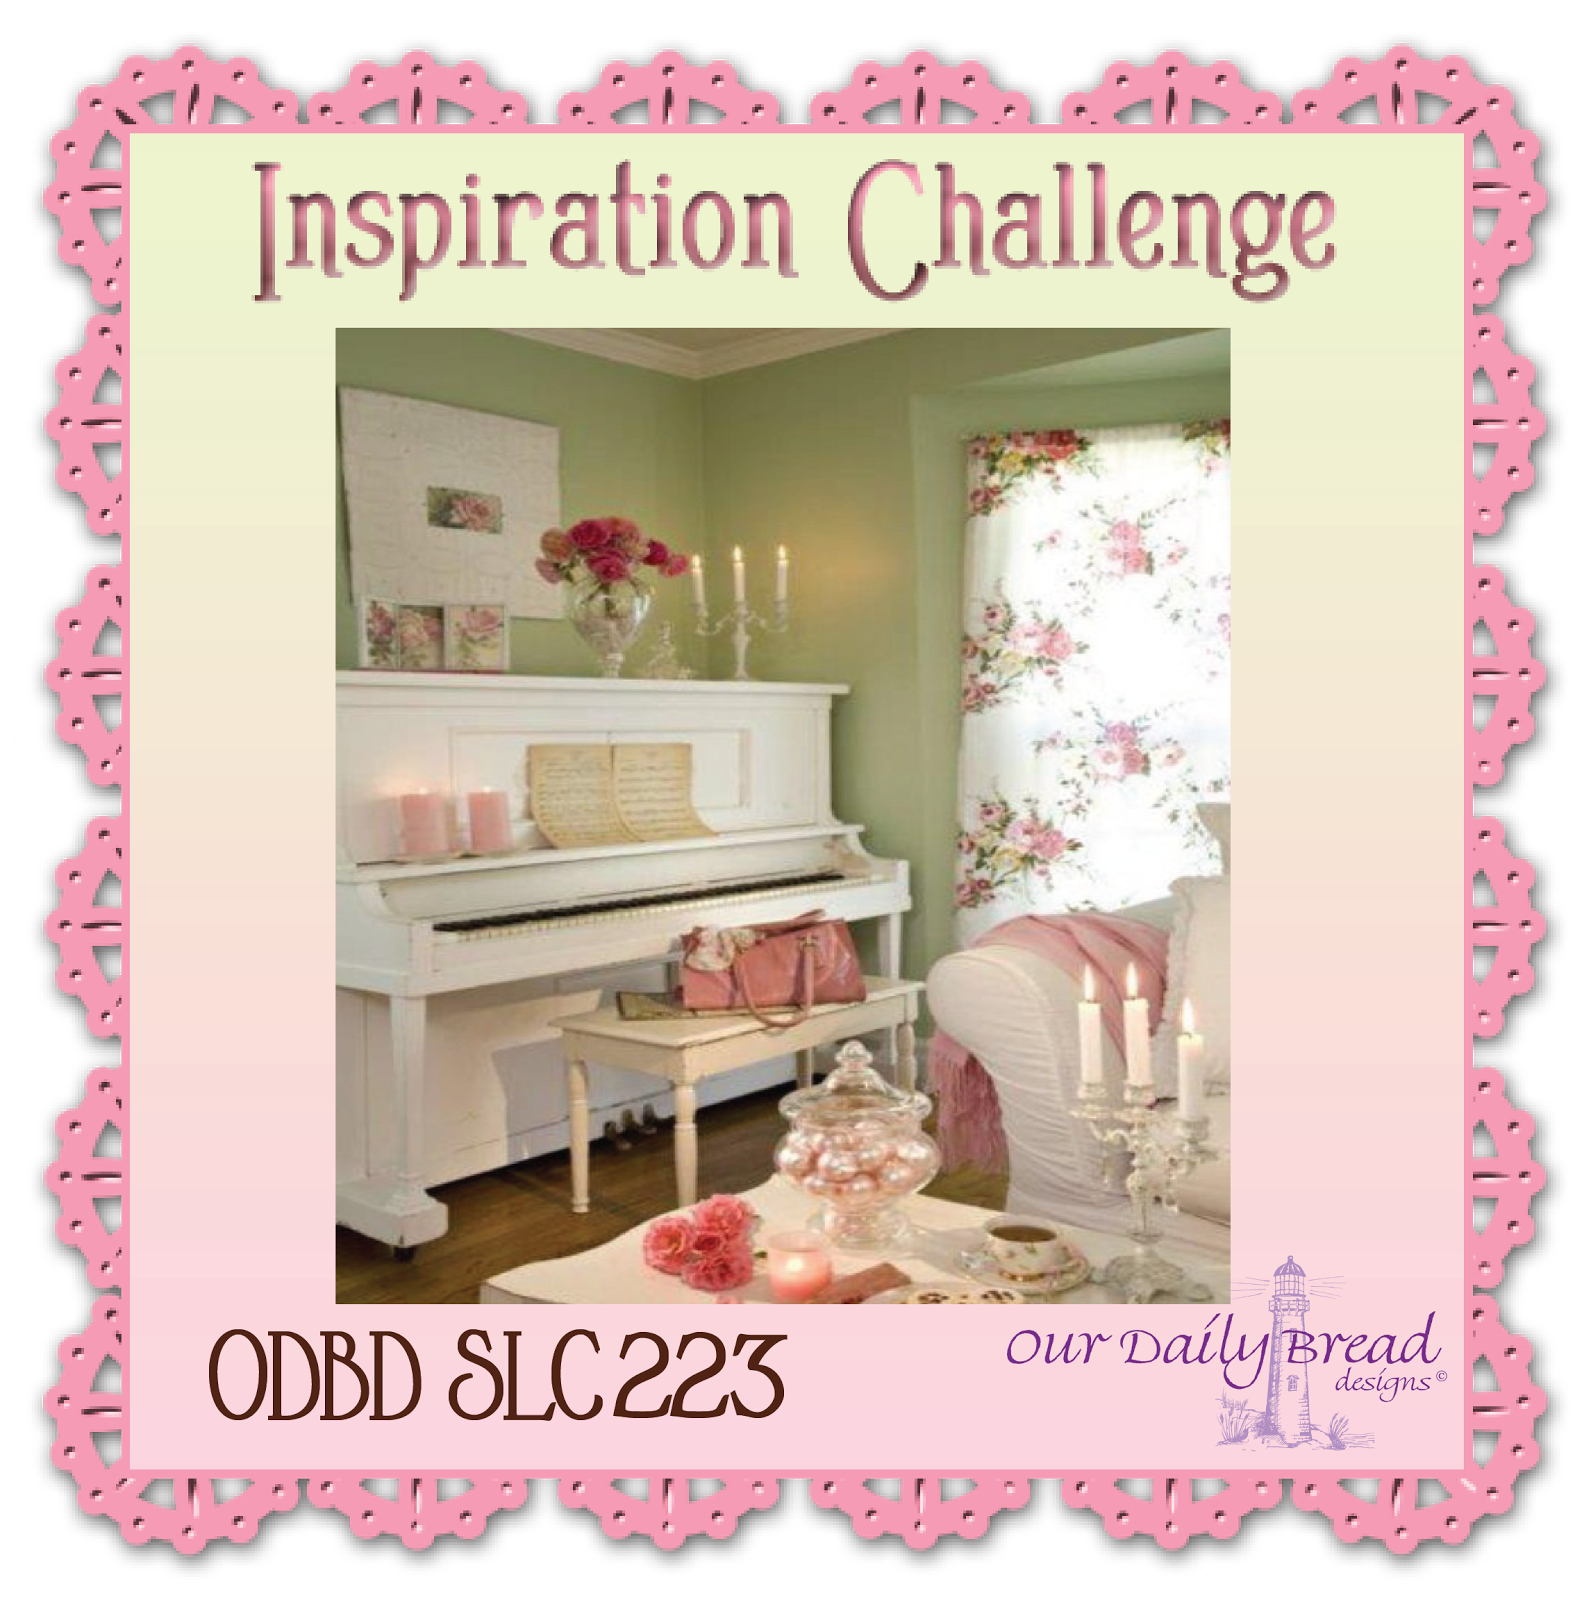
Every third week of the month Our Daily Bread Designs will host an inspiration challenge. In this occasion our inspiration photo for the challenge is a gorgeous shabby chic image, with colors, patterns and textures that you will enjoy working with!

Supplies
Aster dies
Fancy Foliage dies
Beautiful Borders dies
Doily dies
Mini Tag dies
Mini Tag Sentiments
Flourished Star Pattern
I created a shabby chic mixed media card with lot’s of texture and elements that resemble those from the inspiration photo. To create the background:
1. Die cut a pierced matting layer using ODBD’s Flourished Star Pattern.
2. Use a stencil to add embossing paste. I mixed a drop of Distress re-inker in Spun Sugar to a bit of Dreamweaver Pearlescent paste.
3. Cut pieces of drywall tape (from the hardware store) roughly and adhere to the card as desired.
4. Apply Distress Ink Spray in Peeled Paint to opposite corners of the layer.
5. Add a piece of patterned paper and a die cut border from ODBD’s Beautiful Borders across the center of the layer.
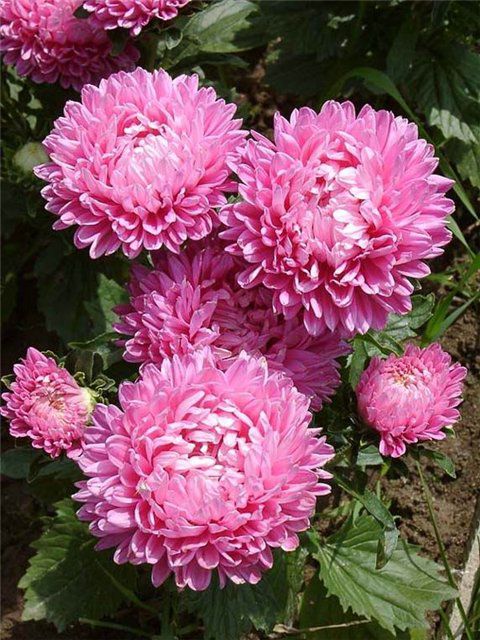
I love to make handmade flowers and this time I had the opportunity to create some beautiful China Asters using ODBD’s Asters and Leaves. Here is one of the pictures that inspired me to make these full Aster blooms using this die set.
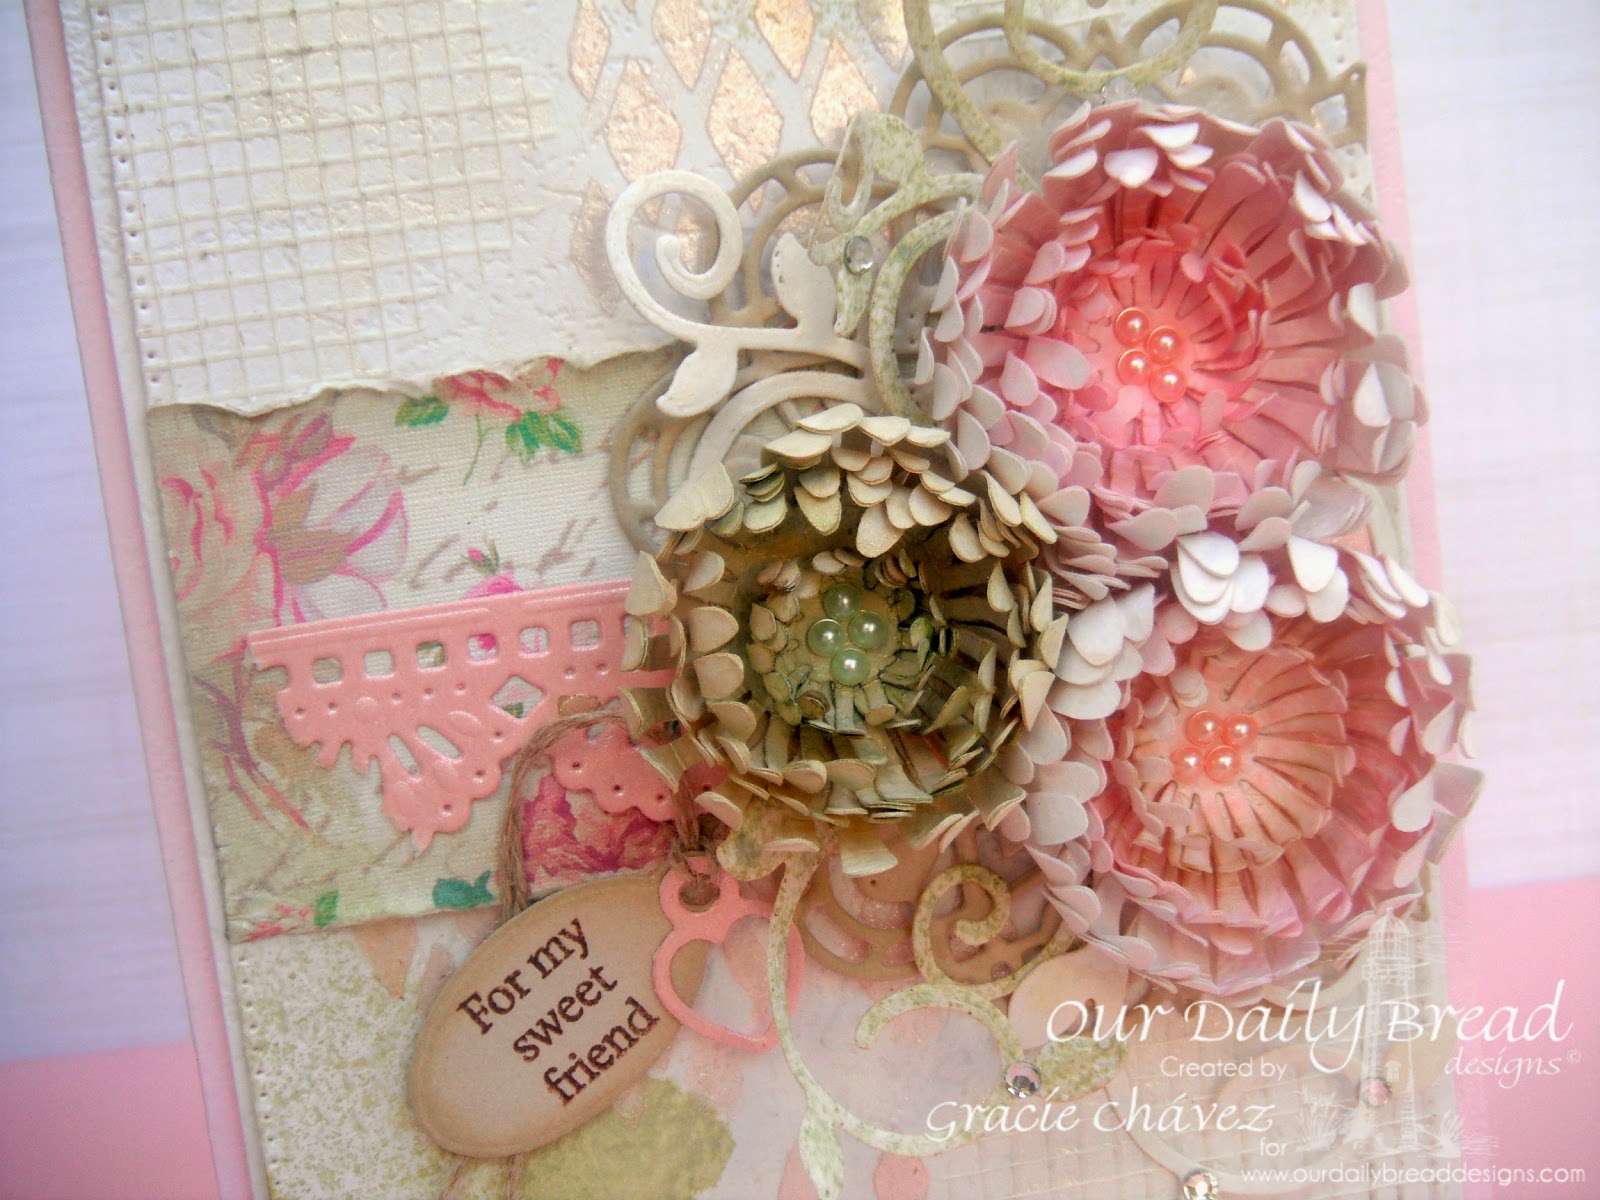
To make these flowers:
1. Die cut all three sizes of Aster dies multiple times from white cardstock. You will need three of each size to create a full flower.
2. Using a round nose plier roll each petal inwards very lightly so you don’t rip the cardstock.
3. Glue the different flowers’ layers one on top of the other using Tacky glue. Remember to use at least three of each size.
4. Color each flower with Distress Ink sprays and Perfect Pearls Mists. I used soft colors like Spun Sugar, Peeled Paint and Biscotti. Re-spray if needed. I applied more color to the center of the flowers to make them look more organic.
5. Next, apply heat using a heat tool to help the flowers curl inwards and dry them also.
6. Embellish flowers with pearls.

I arranged a pretty bouquet with the finished flowers. I die cut a doily using ODBD’s Doily as a base to attach the flowers and different leaves I die cut with ODBD’s Fancy Foliage. I adhered the doily to the right of the card, cutting it partially to remove the piece remainding outside of the layer.
I stamped a sentiment from ODBD’s Mini Tag Sentiments and die cut it using it’s coordinating die set Mini Tags. I also die cut a pretty heart shaped tag. I added a linen thread around both mini tags and attached the to one side of the bouquet. To finish the card I added pretty rhinestones to the leaves and adhered the finished layer to a second white mat and finally to a pink card base.
I hope you liked today’s card and tutorial! I think this would be a lovely card to give to a friend on Valentine’s! I’m also sharing my Snapguide tutorial with you below, which you can share and pin if you want to.
To see all the projects created for ODBDSLC223 or to join the challenge click here. You have until January 25, 2015 at 8:00pm EDT to join us. By participating in the challenge, you have a chance to win a $15 ODBD Gift Certificate good towards the purchase of stamps in the “stamps column” on the ODBD website, or to be spotlighted on the ODBD Blog at our next challenge. The random prize winner will be posted on our next challenge post.
I also invite you to visit my talented teammates’ blogs to see what they created for the challenge. You will be inspired for sure!
I’m sharing my card with:
In the Pink – Anything Goes
Scrap-Creations – Favorite Embellishment (flowers)
Creative Card Crew – Shabby Chic
Inky Chics – Anything Goes
Papertake Weekly – Get in Shape (diamonds, hearts, oval, etc.)
Party Time Tuesdays – Anythings Goes
Craft Hoarders Anonymous – Choose your Challenge
Stamplorations – Stamps and Inks
(Ink sprays, linen thread, mixed media & die cuts, embossing, flowers & bling -pearls-)
Creative Colors – Challenge #28


Such a beautiful card Gracie and thanks for the tutorial. I absolutely love those flowers and all your background is awesome too! Gorgeous job of the inspiration challenge!
LikeLike
Beautiful card Gracie! Love those flowers and thanks for the tutorial.
LikeLike
Oh, Gracie, what a gorgeous card! I love the flowers, and what a great tutorial! Thanks for sharing! Hugs, sweet friend!
LikeLike
Wow! it's really nice!
LikeLike
Oh Gracie, how gorgeous is this!! I just love your 3d and textured flowers. They are very realistic. Your layout and use of dies is just stunning. Thanks for sharing such a great tutorial as well!! Hugs,Chris
LikeLike
S.T.U.N.N.I.N.G! Love everything about your card – from your full luscious flowers to that beautiful background with all those lovely shimmering details. I think this might be one of my favorite of your cards!
LikeLike
Gorgeous asters Gracie!! I also LOVE your mixed media looking bg panel, WOW! Just so beautiful, I love, love, love your card! You did a lot of die cutting for your asters but they are really a Wow! I haven't seen those China asters before, they are so pretty!
Thank you for sharing how to do them!
LikeLike
Gosh, this is so beautiful! This is stunning!
LikeLike
Thanks so very much!!!
LikeLike
Thanks so much Lix!!! Obg.
LikeLike
This is amazing. Love all the details, beautiful stenciling and of course the gorgeous flowers!
LikeLike
Your card is just so beautiful but I'm in love with your pretty flowers. I love making flowers and yours are so real and life like! Thanks for joining us at Craft Hoarders Anonymous!
LikeLike
So pretty and femenine Gracie! What a lovely way to use the Aster Dies.
LikeLike
This is so beautiful! I love your gorgeous flowers – they look stunning. Thanks for sharing your creation with us at In the Pink!
Rebecca.
x
LikeLike
I love asters, and I love this card! Such wonderful texture and beautiful layers! Thanks for sharing with us at Craft Hoarders Anonymous!
LikeLike
Wow, love your flowers, they look so much like the picture. Thanks for sharing with us at Craft Hoarders Anonymous!
LikeLike
You've outdone yourself with this one Gracie. Love the background and gorgeous flowers. Just lovely!
LikeLike
This is so beautiful. Thank you so much for sharing your lovely creation with us at Creative Card Crew.
Hugs
Cathy DT Member
xxxxx
LikeLike
wow! Those flowers are to die for! Such a pretty card and so well executed. I like it a lot.
LikeLike
WOW !!! you are so talented. How beautiful and delicate your flowers are, and look so real. Well done and lucky friend…:0)
LikeLike
Hi,
OMG, What a gorgous card. Those flowers are stunning .
Thanks for joining us at CCC and good luck.
hugs
Claudia
DT Creative Colors Challenge
LikeLike
Gorgeous card, the flowers are awesome.
LikeLike
Beautiful card – your flowers are amazing :o)
Thanks for playing along at PTW this week.
Good luck.
Debs xx
LikeLike
Amazing card! Those asters are fabulous – just like the real flower! Thanks for playing with us at STAMPlorations!
LikeLike
Absolutely love the texture.
Thanks for sharing with us at Craft Hoarders Anon 🙂
LikeLike
Where to start…your flowers are amazing! I love them!!! Gorgeous card for sure and what a great take on the challenge! Hugs ~S~
LikeLike
Where to start…your flowers are amazing! I love them!!! Gorgeous card for sure and what a great take on the challenge! Hugs ~S~
LikeLike
Hi Gracielle… This card is just amazing… I love all those beautiful flowers and if you are ever bored you can always make things for me 🙂 I love your work! Thank you for sharing it with all of us too on the Craft Hoarders Challenge this month…..
LikeLike
Gorgeous Card Gracielle, love your cards and projects. Thanks for joining us on the Craft Hoarders Blog.
LikeLike
your flowers are stunning!!! WOW!!! Thanks for joining our challenge at Craft Hoarders Anonymous!
LikeLike
Gorgeous card Gracielle. I really love those flowers and thanks for the tutorial on how to make them. Thanks for joining us in our “Favorite Embellishment Challenge” at Going Grey With Scrap-Creations and we hope to see back soon. Hugs, Gale DT
LikeLike
This is such a beautiful card! I love the flowers and the shabby style you created. Thanks for joining us at Craft hoarders!
LikeLike
Oh my word! Those flowers are beyond amazing! You did such a great job with them! So pretty! It is so good to see you playing along again in the Craft Hoarders Anonymous Challenge!
LikeLike